Battery switch on travel trailer function is crucial for managing your RV’s power. This guide breaks down how these switches work, the different types available (like 1-2-both and 1-2-off), and how to use them safely. We’ll cover connecting and disconnecting batteries, troubleshooting problems, and maximizing battery life. Get ready to become a travel trailer power pro!
Understanding your battery switch is key to enjoying worry-free RV adventures. From preventing battery drain to safely switching between power sources (shore power, generator, and batteries), we’ll walk you through everything you need to know. This isn’t just about flipping a switch; it’s about understanding the entire power system in your travel trailer and keeping it running smoothly.
Understanding Battery Switch Functionality in Travel Trailers: Battery Switch On Travel Trailer Function
Your travel trailer’s battery switch is a crucial component for managing your power sources. It allows you to select which battery (or batteries) power your trailer’s systems, helping to conserve battery life, prevent accidental discharge, and protect your equipment. Understanding its function is key to safe and efficient RVing.
So, you’re prepping for a road trip? Awesome! First things first: make sure your travel trailer’s power is sorted. Check out this guide on the battery switch on travel trailer function to avoid any dead-battery surprises. Once that’s handled, you can focus on the fun stuff, like setting up your awesome audiophile travel setup – because good music makes any journey better.
Remember to pack your favorite tunes!
Battery Switch Types and Their Purposes, Battery switch on travel trailer function
Travel trailers typically utilize one of two main types of battery switches: a simple on/off switch for a single battery, or a more sophisticated multi-position switch for managing multiple batteries (like a house battery and a starting battery). The most common multi-position switch is a three-position switch: 1, 2, and BOTH (or sometimes OFF, 1, 2, and BOTH). A 1-2-BOTH switch allows you to select either the house battery (position 1), the starting battery (position 2), or both batteries simultaneously (position BOTH).
This setup is particularly useful for charging both batteries at once or for running high-power appliances. An OFF position completely disconnects both batteries, preventing accidental drain. A simpler two-position switch might only offer “ON” and “OFF”, selecting a single battery.
So, you’re hitting the road in your travel trailer? Awesome! First things first: make sure you understand the battery switch on travel trailer function – it’s crucial for managing your power. Once you’ve got that sorted, think about your entertainment. A killer audiophile travel setup can seriously elevate your road trip experience.
Seriously, good tunes make all the difference!
Operating a Typical Three-Position Battery Switch
Operating a three-position battery switch is straightforward. First, locate the switch, usually found near your battery compartment or inside a convenient access panel. It’s typically a rocker-style switch with clearly labeled positions (1, 2, BOTH, and potentially OFF). To power your house appliances from the house battery, select position “1”. To start your trailer’s engine, select position “2”.
If you’re charging both batteries with your tow vehicle, or if you need the combined power of both, select “BOTH”. Remember to switch to “OFF” when you’re not using the trailer for an extended period to prevent battery drain. Always double-check the switch’s position before attempting to start the trailer or use any appliances.
Comparison of Battery Switch Types
| Feature | Single Battery Switch (ON/OFF) | Three-Position Switch (1-2-BOTH/OFF) | Two-Position Switch (ON/OFF) |
|---|---|---|---|
| Number of Batteries Controlled | One | Two | One |
| Power Management Options | On or Off only | Individual battery selection, combined power, or complete disconnect | On or Off only, for a single battery |
| Complexity | Simple | Moderate | Simple |
| Cost | Low | Medium | Low |
Connecting and Disconnecting Batteries

Connecting and disconnecting your travel trailer’s batteries requires careful attention to safety and proper procedure. Understanding how to do this correctly will ensure the longevity of your batteries and the safe operation of your RV’s electrical systems. Improper connections can lead to corrosion, damage, and even fire hazards.Connecting the house battery (typically a deep-cycle battery used for appliances) to the chassis battery (usually a starting battery for the vehicle’s engine) involves using a battery switch.
This switch allows you to isolate the house battery from the chassis battery when not in use, preventing unwanted drain on the house battery. Disconnecting involves simply switching the battery switch to the “off” position. Remember to always disconnect the house battery before performing any maintenance or repairs on the trailer’s electrical system.
Connecting and Disconnecting the House Battery
The process of connecting and disconnecting the house battery typically involves a battery switch. This switch is usually located near the batteries themselves and offers positions for “Both,” “House,” “Off,” and sometimes “Start.” “Both” connects both the house and chassis batteries. “House” connects only the house battery. “Off” completely disconnects both batteries. To connect, simply move the switch to the “Both” or “House” position depending on your needs.
To disconnect, move the switch to the “Off” position. Always consult your specific RV’s manual for the correct switch operation.
Maintaining Battery Connections
Proper battery maintenance is crucial for preventing corrosion and ensuring reliable power. Corrosion can build up on battery terminals, hindering current flow and potentially causing damage. To prevent this, regularly inspect the battery terminals and clean them with a wire brush and baking soda solution. Apply a battery terminal protector after cleaning to help repel moisture and prevent future corrosion.
Keep the battery area clean and dry, and ensure proper ventilation to avoid the buildup of corrosive gases.
Safety Precautions When Working with RV Batteries
RV batteries contain corrosive acid and can produce flammable hydrogen gas. Always wear appropriate safety gear when working with them, including eye protection (safety glasses or goggles) and gloves. Ensure adequate ventilation in the area to prevent the buildup of hydrogen gas, which is highly explosive. Never allow sparks or open flames near the batteries. If you smell a strong sulfur odor (rotten eggs), it indicates a potential battery problem and you should discontinue work immediately and seek professional assistance.
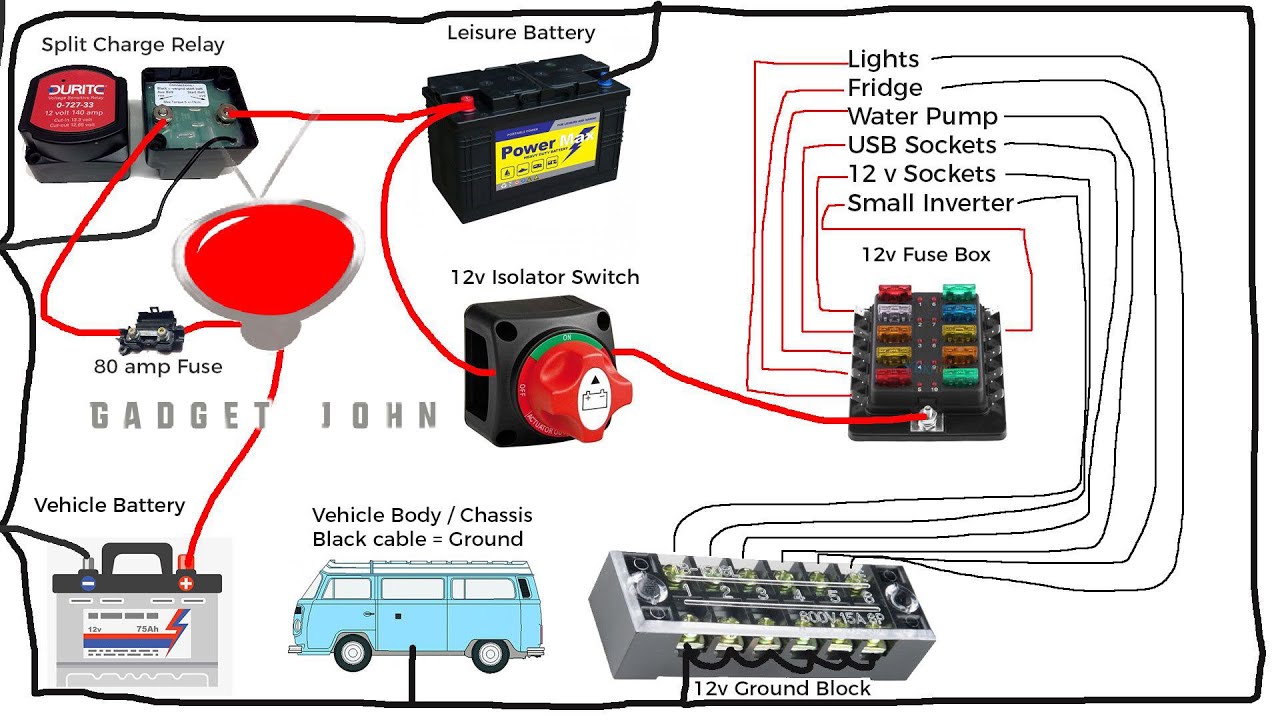
Typical Travel Trailer Battery Wiring System
Imagine a diagram. At the top, we have the chassis battery, usually a group 24 or 27 series battery. A heavy-gauge wire runs from its positive terminal to the battery switch. Another heavy-gauge wire runs from the negative terminal of the chassis battery to a ground point on the trailer’s chassis. The battery switch has four terminals: one for the positive input from the chassis battery, one for the positive output to the house battery, one for the negative input from the chassis battery, and one for the negative output to the house battery.
From the positive output of the battery switch, another heavy-gauge wire runs to the positive terminal of the house battery (typically a deep-cycle battery, often a group 27 or 31 series). A separate heavy-gauge wire runs from the negative output of the battery switch to the negative terminal of the house battery. Finally, a smaller-gauge wire runs from the house battery to the 12-volt distribution panel inside the trailer.
This panel distributes power to various appliances and outlets. All connections are secured with appropriately sized bolts and nuts, and corrosion-resistant washers are used. The entire system is protected by fuses or circuit breakers to prevent overloads.
Mastering your travel trailer’s battery switch isn’t just about avoiding dead batteries; it’s about maximizing your RV’s power potential and ensuring safe operation. By understanding the different types of switches, proper connection techniques, and common troubleshooting steps, you’ll be prepared to handle any power situation on the road. So, grab your multimeter, review this guide, and confidently hit the open road!
Commonly Asked Questions
What happens if I leave my battery switch on “both”?
Leaving the switch on “both” constantly drains your house batteries even when not using the trailer. It’s best to turn it off when not in use.
How often should I check my battery connections?
Inspect your battery connections at least every three months for corrosion. Clean them as needed.
My battery switch is stuck. What should I do?
Try lubricating the switch with a penetrating lubricant. If that doesn’t work, you may need to replace the switch.
Can I use a different type of battery switch in my travel trailer?
You should only use a battery switch with the same amperage rating as your original switch. Consult a professional if you are unsure.
